
Create and Manage Your Own Image Gallery in Modern Forms with Ultimate Forms
Modern forms are more than just data capture. They’re an opportunity to engage, clarify, and brand. One way to do that is by using your own gallery of images (or banner graphics, video, or shared visuals) inside forms. With Infowise Ultimate Forms, you get a flexible Image, video or banner control that allows you to integrate custom imagery in ways that support both utility and aesthetics. Whether it’s an onboarding flow, product selection, or help content, managed galleries make your forms more vivid and contextual.
What the Image / Gallery Control Supports
Here are the core capabilities of the gallery/image control in Ultimate Forms:
-
Upload & Gallery Mode: You can upload multiple images to use as shared visuals in forms. This means you maintain a pool of graphics that can be reused.
-
Custom Image via URL: Use your own image by providing its URL, assuming the image location is accessible to users. This is great when you host images in Site Assets or another library or CDN.
-
Width, Height & Positioning Control: You can specify how wide or tall the image/banner should be, and set the relative horizontal/vertical position of the image within that banner area. That ensures the image/banners display well across different devices or screen sizes.
-
Video Support (YouTube): If you want richer media, you can embed videos (YouTube) using the control in place, providing the video URL and defining the size of the video area.
How You Can Leverage Image Galleries in Forms
Using galleries or banner images isn’t just decorative—it can be highly functional. Here are real-world scenarios where managed image galleries add value:
-
Onboarding / Welcome Forms
Have gallery visuals showing steps in your onboarding journey. When a user opens a New form, the banner might display images like “Step 1: Fill in your profile,” “Step 2: Get above desk setup,” etc. This provides visual cues, reduces confusion, and sets expectations. -
Help / Guidance Graphics
For forms that require compliance, safety instructions, or complex data entry, a gallery control could hold images like diagrams, policy snippets, or sample filled forms. It’s a way to embed visual instructions directly in the form to reduce errors. -
Branding & Theming
Forms used externally or in customer-facing scenarios often benefit from consistent branding. Using shared banners or gallery images with your organization’s logo, brand color themes, or product imagery helps reinforce identity and professionalism. -
Dynamic Banners
Depending on the stage of a form or column values, you might switch which banner or image shows. For example, if the form is for “Expense Approval”, you may show one image for "High Spend" vs another for “Low Spend”. With permission rules in Ultimate Forms you can choose which image to display based on user input.
Setting It Up: Step-By-Step
Here’s how to configure and manage image galleries or shared images inside your form design:
-
Add the Image, Video or Banner Control
-
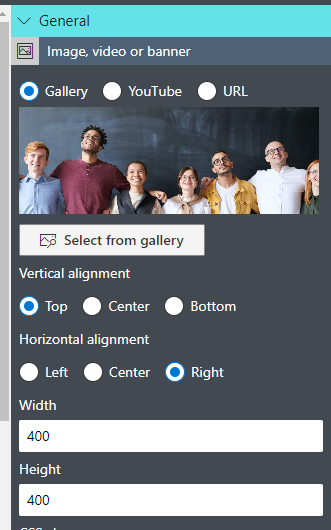
In the Form Designer, drag in the Image, Video or Banner control.
-
Choose to use the Gallery mode (default). For gallery mode, point to the shared images.
- Click on Select from gallery. You can select from a wide variety of images provided by Infowise.
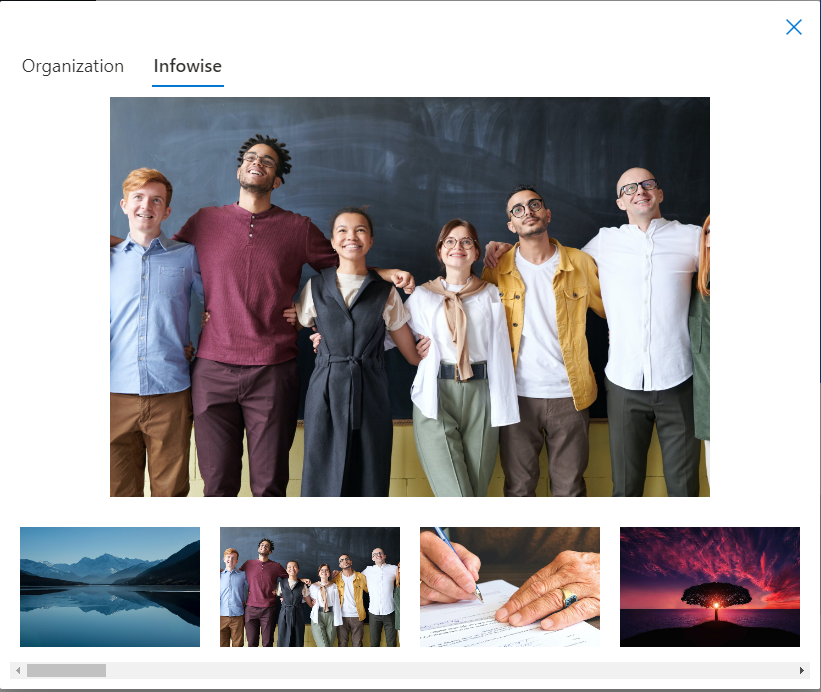
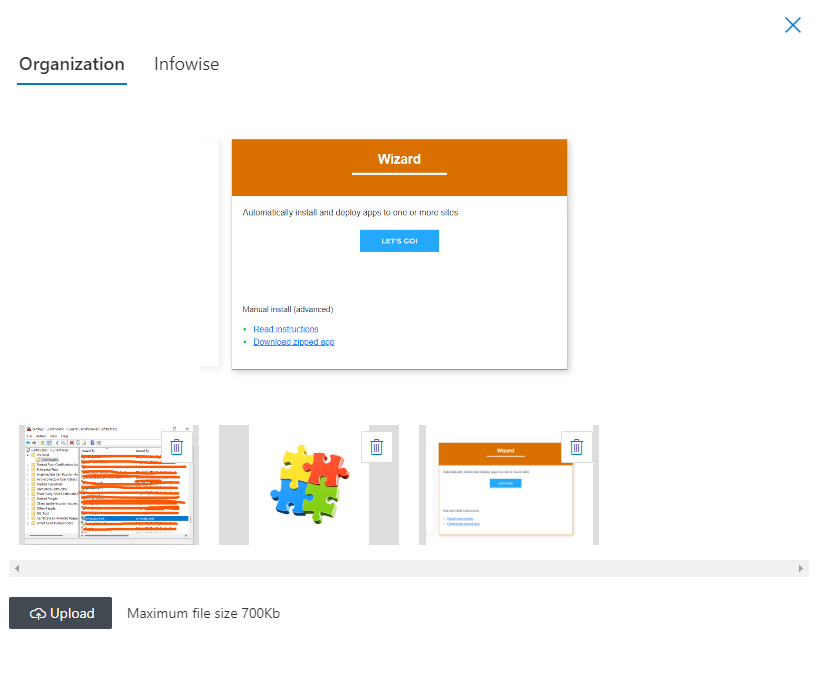
- Or you can switch to Organization to upload and select your own images
-
-
Provide Custom Image via URL (if desired)
-
If hosting images in a picture library on SharePoint or using an external storage, provide the publicly accessible URL in the control settings. Just confirm access permissions so users can see the images.
-
-
Configure Sizing & Position
-
Set width and height. Consider device responsiveness: a banner should scale gracefully.
-
Position horizontally or vertically (e.g. align left, center, or right; align top, center, or bottom).
-
-
Optional: Add Video (YouTube)
-
If embedding a video, use the video URL. Size it appropriately; for example, wider for desktop, but ensure mobile displays nicely.
-
-
Conditional Visibility / Permissions
-
Optionally, wrap the image/gallery control inside containers or apply permission rules. For instance, show one banner only for certain users (e.g. managers) or hide images when form is in Display mode.
-
-
Preview & Test Across Devices
-
Use mobile and desktop previews. Test with different screen sizes. Ensure images aren’t cut off.
-
Confirm loading speed: using large images may slow form rendering. Use compression if needed.
-
Tips & Best Practices
To get the best impact from your image galleries, here are some guidelines:
-
Optimize Image Size: Use compressed images so form load times remain fast. Large, high-resolution images may look great but hamper performance, especially on mobile.
-
Consistent Aspect Ratios: If you use multiple banners or shared graphics, maintain consistent aspect ratios to avoid weird cropping or misalignment.
-
Accessibility: Provide alternative text (alt text) for each image. If images are used for instructions, ensure users who can’t see images still get context (e.g. via fragment text or labels).
-
Use Meaningful Visuals: Images should add value—not just decor. Something memorable or useful: sample output, brand imagery, diagrams, or step visuals.
-
Fallbacks: If an image URL is broken or not accessible, ensure form still works gracefully. Also ensure permissions are correct so users don’t see broken image placeholders.
-
Maintain Galleries Over Time: Remove outdated images or refresh banner visuals to keep the form experience fresh and relevant.
-
Naming Convention: Name your shared images clearly (e.g. “ProductSelectBanner.jpg” or “SafetyInstructionsDiagram.png”) so form designers/admins can easily choose the right assets.
Why These Capabilities Are Valuable
Here are the advantages you and your organization gain by using managed galleries:
-
Better user engagement: Visual cues help orient users, reduce confusion, and improve form completion rates.
-
Reduced training overhead: Instead of separate documentation, integrating visuals means users get guidance inline.
-
Stronger branding: Forms with consistent visuals and banners look more polished and align with the organization's identity.
-
More flexible reuse: Having shared images or galleries means you can reuse the same assets across different forms or sites without uploading duplicates.
-
Dynamic experience: Combined with conditional logic, visibility, or permissions, images can be part of adaptive UIs—so the visual content shown matches context.
Common Pitfalls & How to Avoid Them
-
Using too many large images slows down form loading; ideal to limit number of images in the form, prioritize essential visuals.
-
Forgetting about permissions: images stored in a place users don’t have access to will show broken links—always test with low privileges.
-
Over-decorating forms so they become visually heavy and distract from data entry—visuals should support, not overshadow functionality.
-
Relying on external URLs without fallback if the external host is down or image moves. Whenever possible, host in your own SharePoint or library under your control.
-
Neglecting mobile formatting: banners that look good on desktop may truncate poorly on phones. Preview and adjust.
Summary
Image control in Infowise Ultimate Forms gives you a powerful way to embed visual context in SharePoint forms—banners, shared images, graphics, videos—without needing code. They help you guide users, boost engagement, reinforce branding, and make forms more intuitive.
When combined with conditional visibility, sizing/positioning settings, and shared assets, the image controls let you create modern, responsive, and polished form experiences. If you’re redesigning or building new forms, consider what visuals will help clarify your questions and delight your users.